Home Blog Page 79

How to Change Your iOS8 Keyboard

0

iPhone & iPad users have long been used to using the same standard issue keyboard. But did you know that since the introduction of iOS 8 you’ve had the option to change it?

Maybe you don’t want to change it- after all familiarity is rather nice, but if you’re bored of the stock keyboard there are options available.

Prior to this timely upgrade to iOS 8 you could only change your keyboard if you used a dedicated app.

Not exactly the easiest way to go about customising an essential piece of software, which makes us wonder why Apple took so long to implement this change.

If you’re an Android user you will be wondering what all the fuss is about. After all, you’ve been able to customise your keyboard for years…

Either way, the update has been around for a while now, so let’s take a look at how to change it:

Settings à Enable Third Party Keryboard à *Choose pre-installed third-party keyboard*

But maybe you’re still not satisfied with this selection and want to explore some of the more advanced keyboards that have made the switch from Android.

To help you choose from this upgraded selection we decided to include our three favourite third-party keyboards for iOS:

  •  Swift Key

Probably my favourite out of the list. Swift Key offers extremely competent autocorrection and predictive text functionality in a vast array of languages.

Pro: Bi Linguals can write in two languages at once

Con: Distinct lack of themes

  •  Themeboard

If a lack of themes is inhibiting Swift Key on iOS the aptly named Themeboard excels thanks to the huge array of themes that a user can choose between.

Themeboard offers designers the opportunity to create keyboards and while some are free you might have to pay $1 or $2 to get one you really like.

Still, the free selection is pretty commendable and should offer something for everyone.

Pro: Lots of themes and it’s free!

Con: You might spend a bit too much on customisation…

  •  Swype

Again the name rather gives the game away. With Swype you can choose to ‘type or swype.’

The swiping element may take time to get used to but if your thumbs are tired of constantly hen-pecking your screen then you might enjoy the novelty of swiping through texts.

Interestingly, Swype actually gets better the more you use it as it gets ‘used’ to your texting style.

This lends itself to speedy and relevant auto & phrase corrections and predictive text functionality.

Pros: Swype commands for symbols, including punctuation and capital letters. Add custom words to your personal dictionary (No more laughable auto-corrections).

Cons: If you’re a typist and not a Swyper stick to the top two.

Using Siri with Shazam to Identify Unknown Music Tracks on YouTube

0

Ever hear a new song on a YouTube video and want to know the name of the artist and the track? If you have an iPhone with iOS 8, you can take advantage of Siri’s Shazam integration to quickly and easily identify any and all unfamiliar songs playing in your vicinity.

Starting in iOS 8, Siri uses Shazam and its extensive music database for music identification. Though Siri uses Shazam, the Shazam app does not need to be installed on your iOS device as this integration is built into the Siri service itself. If you need to identify a lot of music, you may want to install the Shazam app for its additional features, but it is not necessary for the basic identification feature offered by Siri

Identify a song using Siri

When you hear a song that you want to identify, all you need to do is launch Siri and ask the assistant to name that song.

  1. Play the song you want to identify or make sure it is playing in the background.
  2. Activate Siri by pressing and holding the Home button.
  3. Ask Siri to identify the song by saying “What song is playing?”, “Identify this tune”, “What is that music?” or a similar phrase.
  4. Siri will confirm your request by responding “Let me listen…”, “Naming that tune”, etc.
  5. Within a minute, Siri will present the song title, artist name and album information. The results also allow you to purchase the song via iTunes or send the song information to the Shazam app if it is installed.
  6. Tap the home button to exit Siri when you are done.

Viewing your Siri music history

Besides identifying songs, Siri also stores all your identified songs in a viewable history that is stored in the iTunes app on your iPhone or iPad. Follow the steps below to view your Siri music history.

  1. Open the iTunes app.
  2. Tap the menu icon in the upper right hand corner.
  3. Tap the tab for “Siri” to view a list of all the songs that Siri has recognized.

From this list, you can tap on a song to listen to a preview or view additional details about the album or artist. You also can purchase the track by tapping the price and then selecting “Buy Song.”

Three Brilliant iPhone Features You Might Not Know

0

The iPhone’s got hidden depths and many of us haven’t scratched the surface of what these incredible cell phones can achieve.

In this article we explore three features- some that are just fun and others that are useful- that many iPhone users do not even know about.

So start making the most of your iPhone by utilising these incredibly cool features:

1) iPhone Camera – Burst Mode (For iPhone 5s or Newer)

Ever missed the opportunity to take that perfect picture. The once in a lifetime moment and you slightly mistimed capturing the shot and missed it…

Not anymore. Because with the iPhone Camera’s burst mode you won’t miss any of the action- although you might find your memory depletes at a similar speed to the snap of that shutter if you overuse it!

The Burst mode allows you to take approximately ten photos in a second, so you can perfectly capture those moments that are not to be missed.

Simply hold down the ‘photo button’ to enter burst mode and fire away.


2) Limit Ad Tracking

There is certainly something Big Brother-esque about the use of data tracking for advertising purposes.

If you’re someone who’s concerned with the use of your data in this way then this point will be particularly useful foryou.

Because the iPhone can be a friend and not just a foe when it comes to leaving a digital trail.

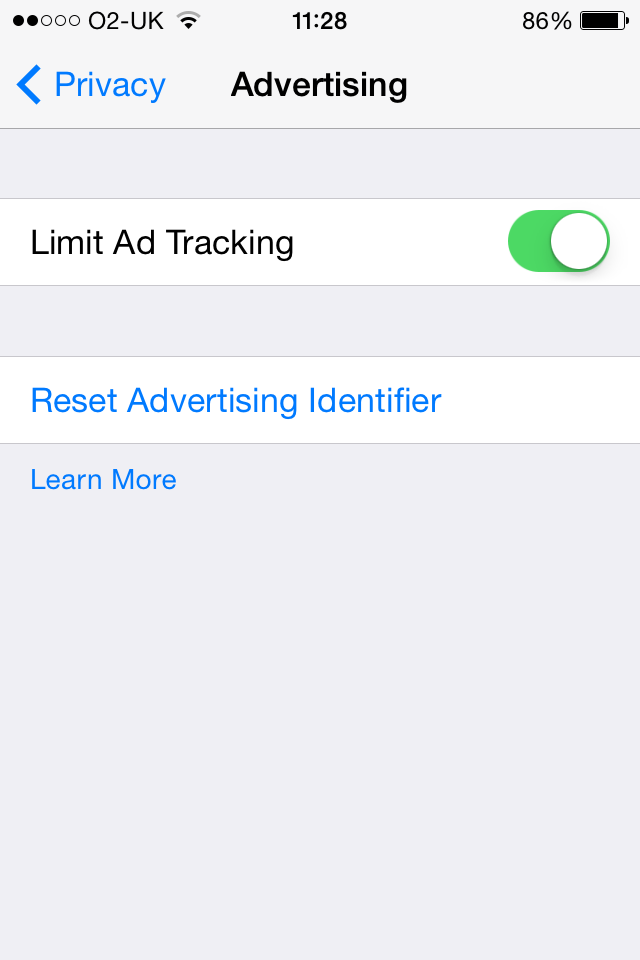
Simply turn on the ‘Limit Ad Tracking’ feature: Settings -> Privacy ->Advertising -> *slide to* Limit Ad Tracking.IMG_0688

This will stop Ads being customised to you personally, but won’t stop Ads showing up altogether.


3) Block Calls and Texts

I recently purchased a domain and have since been inundated with ‘cold’ sales calls and pesky emails from seemingly every web designer in the world.

They’re extremely persistent and to stop these calls I utilised this extremely useful feature.

Let’s be honest, everyone’s been stung by a cold sales call or a persistent caller they desperately don’t want to talk to at some point in their life, so this feature should come in very useful.

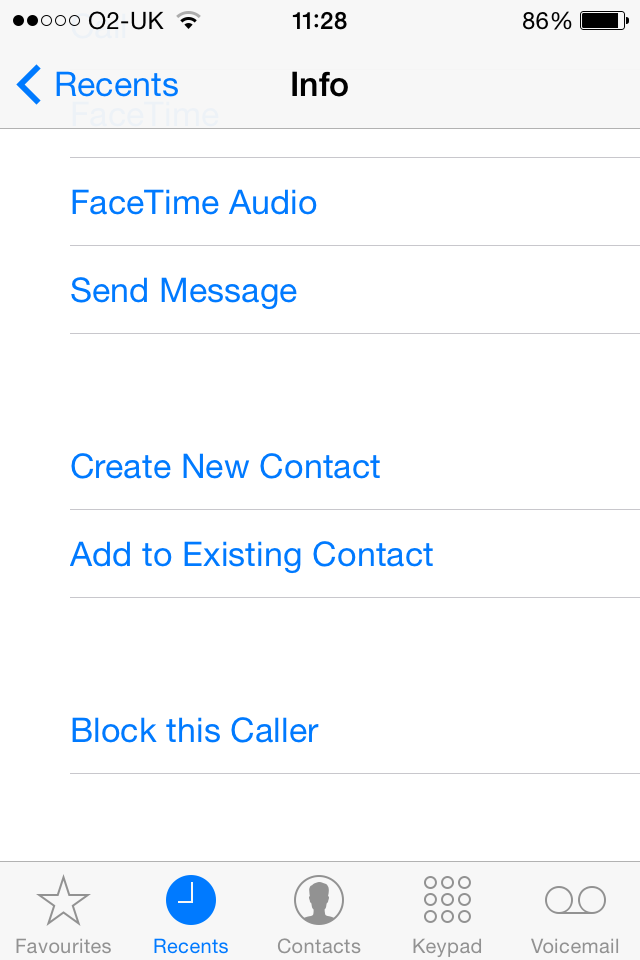
Here’s how to do it if you want to block one of your contacts:IMG_0687

Settings –> Phone –> Blocked –> Add New –> *Select person you wish to block from contacts*

If it’s a cold caller you want to block the process is simple too:

*Select Phone on the Home screen* –> Recents –> *Locate the number you wish to block* –> *Click the ‘i’ icon* –> *Select ‘block this caller’*

~~~

Hopefully some of you will find these features as useful as I have!

Follow Henry on Twitter For more tech news and reviews.


How to quickly send selfies, videos and audio messages in iOS

0

Like most modern mobile operating systems, iOS makes it easy to send messages to family and friends. While most messages contain quick snippets of text, you also can send selfies, videos clips or audio messages via the same method you use to send your text-based communications.

Quickly send a selfie to your friends.

The iOS Messaging app integrates with the camera app and allows you to snap a photo quickly and send it off to your family or friends. It’s a great way to share a moment while it still is occurring.

  1. Open the Messages app on your iOS device (requires iOS 8 or greater).
  2. Tap the compose button in the upper right corner or select an existing Messaging conversation.
  3. Tap and hold on the Camera icon in the bottom left to open the Camera interface.
  4. Use the flip camera icon in the top right corner to switch to the front camera if necessary and then tap the camera button on the left side to take a photo.
  5. Once you take a photo, the image will be processed and sent automatically to the recipient.

Send a Video Message to a contact

Sending a video message is very similar to sending an image, except there is one major difference — instead of snapping a photo with the camera, you need to to select the video camera as follows:

  1. Open the Messages app on your iOS device (requires iOS 8 or greater).
  2. Tap the compose button in the upper right corner or select an existing Messaging conversation.
  3. Tap and hold on the Camera icon in the bottom left to open the Camera interface.
  4. Use the flip camera icon in the top right corner to switch to the front camera if necessary and then tap the red recording button on the left side to take a video
  5. Tap the recording button again to end the recording.
  6. Select the play button if you wish to review the clip or tap the up arrow to send the clip automatically. You also can tap the “x” to cancel the recording.

Record and send an audio message

Sometimes the simplicity of an audio message is preferable to a video message. Audio messages are easier to record and take less time to send because their file size is significantly smaller than a comparable video file. Sending an audio message is easy thanks to the microphone integration that is built into iOS 8. Here’s how:

  1. Open the Messages app on your iOS 8 device.
  2. Tap the compose button in the upper right corner or select an existing Messaging conversation.
  3. Tap and hold the Microphone icon on the right side of the screen to begin the audio recording.
  4. Release the microphone icon to end the recording.
  5. Tap the Play button to review the message before sending or select the Up arrow to send the message. You also can tap on the “X” to cancel the recording.

Microsoft’s Cortana is Coming to iOS and Android

0

We have all heard of Microsoft’s grand theory of unity, where it plans to unite the mobile and desktop endpoints with Windows 10 mobile and Windows 10 OS. However, Microsoft forgot the fact that not everyone would be willing to take up Windows 10 Mobile despite being Windows desktop users.

Microsoft however has come to the rescue with the announcement that it plans to bring Cortana to iOS and Android. The digital assistant will come as separate apps, both for Android and iOS, allowing users to make similar queries and ask similar questions across all three platforms, Windows, Android, and iOS.


Cortana on Android and iOs will, of course, not be as powerful as its Windows variant, but Microsoft promises that users will be able to receive notifications similar to what they get on Windows Phone like flight and sports results notifications.

To install Cortana, users will need to use a ‘Companion app’ on Windows 10 desktop PCs. In a video released on YouTube by Microsoft. Joe Belfiore, a member of the Windows team, demonstrated how mobile devices can be set up to work with a Windows 10 PC. He demonstrated how OneDrive on an iPhone can be used to mirror pictures onto a Windows 10 PC and allow one to view pictures taken on the iPhone right on the desktop. Playlists can also be synced across devices allowing one to carry and enjoy a similar experience whether on a mobile device or a desktop machine.

Cortana has been built right into Windows 10 PC just as it had been done on the Windows Phone. On an Android phone, Cortana appears as an app. Joe demonstrated how an Android phone can wake up and buzz when Cortana has a notification.

Today, people want to use the same and preferred device for everything while having a seamless experience with other devices and machines they own. Microsoft has made this possible by bringing Cortana to both the iOS and Android platforms.